Thursday, March 28, 2013

Fast Homemade Tomato Soup with Grilled Cheese Croutons

This is a keeper. You know how in the spring you plant some herbs and before you know it, they're already puttered out and you haven't used them more than twice? This is the reason that won't happen this year. So good you can make it twice a week and no one will say a word.

In a saucepan melt
6 tbsp butter
Add two medium or a really large onion, chopped, and
Three large cloves garlic chopped.
Cover and let cook till soft.

Now dump in
a tall bottle of tomato purée, I think it's 24 oz,
2 tbsp brown sugar,
two vegetable bouillon cubes, and
4 cups of hot water.
Blend with a stick blender (or do it in a blender and don't burn yourself) thoroughly.

In a bowl, put a bunch of herbs. Basil, rosemary, thyme, parsley. Lemon thyme is fabulous. All good. Chop em up well and then add salt and pepper. Put in your soup, bring to a low boil, turn off heat and blend again. Stick blenders are wonderful things I do have to say. You need one.
Anyway, the soup is done. Cover and let wait till your croutons are ready too.

Cut up some old bread. Baguettes, Italian, hard, soft, even white bread (gasp!). Cut into bite sized cubes and put in a bowl. Drizzle all over with olive oil to make sticky. Toss in some herbs. Whatever you think. Oregano, basil, parsley, thyme. Add some garlic powder. About a tsp per 2 cups of cubes. Now Salt and pepper. Then the Parmesan comes in. Grated is ok but the shredded is really nice if you can get it. Pour it all on a sheet of foil on a cookie sheet, and put under the broiler for 3-4 minutes, turning as you see them toast. Serve!

Homemade soup with homemade toasty cheesy croutons. Yum!

They'll be asking for an encore... Enjoy!

Wednesday, March 27, 2013

Just Smashing Chicken

The Sicilian brought two more chickens home today instead of chicken breasts. Well, it was the same price so yay for economy and freebies!

Took off the breasts and froze for another day, and what to do with the rest? This time we made brick smashed chicken.

Cut the chicken with some shears straight down the breast bone. Open up the chicken and either using a brick (a clean one I hope) or maybe a mallet, smash it on the back. You'll have what I show in the picture. Imagine laying on your tummy flopped on the bed. I do anyway haha.

Sprinkle the underside generously with
Sea salt
Fresh ground pepper
Smoked or spanish Paprika
Garlic salt
Crushed dried Rosemary
Flip over onto a grill / grate over a pan to catch drippings and sprinkle again.

Roast at 350 for about an hour.

If you want to make sauce or gravy for it, take two tbsp of the drippings and put in a skillet. In a little bowl mix 2 tbsp cornstarch with a little water and set aside. Heat the grease, then add 1/2 c white wine, 1/2 c water and half a bouillon cube. Cook till the bouillon is dissolved and taste. Salt to taste and add the cornstarch. Cook just a minute till thickened. Pour over the chicken and serve. Enjoy!

Monday, March 25, 2013

Cuteness on a Cupcake

Tonight my son received the Eagle badge from the Boy Scouts of America. Quite a to-do I must say. Loads of fun and a few tears shed.

Part of it is food. Eagle ceremonies have, of course, the eagle as their theme. This the plethora of eagle themed food.
- wings
- chicken salad
- fried chicken
- deviled eggs
- an so on.

A dear friend of mine and I made these cuties. Marshmallow eagle heads to top chocolste iced cupcakes.
Not hard and fun to do.

Melt a block of almond bark in the microwave or on a double boiler. Stir every 10 seconds until melted.

Coat a large marshmallow and place on waxed paper on a cookie sheet.
Immediately stick a whole cashew on for the beak Then sprinkle with coconut. Lastly make black eyes with a tiny tube of icing from the store. They'll sit a day or two if you like. The icing should be chocolate as bald eagles have brown bodies. These are great and wonderful tasting. And were a hit at the party along with the mini cheesecakes. Try them! Enjoy.


Saturday, March 23, 2013

Egg Benedict Bites

What a great thing. Eggs Benedict you can eat with your fingers. And you know it isn't that messy because I'm not the finger-lickin' type.

You can do this in just a few minutes, or really the time to boil eggs and make the hollandaise. Oh, and they can be however you like. Love smoked salmon? Do it. Have some left over spinach? Sauté with garlic and butter and use it. It's a platform for anything you can imagine.

Toast some bread and cut in fours.

Boil some eggs. (Btw, the absolute fool proof way is to cover the eggs with water and put on just under max heat. When comes to a rolling boil, time 5 min. Then remove from heat and run cold water over it till you can handle peel and slice. Perfect. )

Make Hollandaise: in a metal or glass bowl whisk three egg yolks with 1/4 tsp salt, a pinch pepper, and 2 tbsp lemon juice. Put a small saucepan of water on to boil. Melt a stick of butter separately. Place egg bowl over the boiling water and whisk as you drizzle the butter in. Keep whisking over the water until the sauce takes a consistency that it coats a spoon thickly. Done.

We layered
Toast
Smoked salmon
Sliced egg (salt and pepper)
Sautéed spinach w garlic and butter
Slice of avocado
Hollandaise.

Kids were fighting over them. So good. Served for birthday breakfast today with Nutella croissants, cappuccino, mango, and homemade Orange Julius.

Enjoy!


Friday, March 22, 2013

Grilled Vegetable Lasagna

We do love lasagna. It's just pasta though and there's no real mystery to it. If you can put it on pasta, you can use it with lasagna.

In fact, lasagna is just the shape of the noodle. Pasta al forno, or pasta from the oven, is a great way to make pasta ahead of time and even to make it portable. Just undercook any pasta, just till soft, in salted water, and drain. Make your sauce, and then mix them all together. Later in a pan with cheese and bake. Done.

But that's another story.

Vegetable lasagna is faster even than meat lasagna. You need:
Grilled vegetables, like sliced eggplant, sliced zucchini, mushrooms or grilled onions
Sliced tomato
Parmesan
Lasagna noodles
Vegetable broth (make your own with water, a tomato, a carrot, an onion)
2 liters Besciamella (see my other lasagna recipe for instructions, but it's doubled with 2 liters milk, 1.75 sticks butter, 2 c flour )

Prep your ingredients and set up to assemble. Key is to flavor each thing perfectly. Salt the veggies. Sprinkle the tomatoes with salt basil and olive oil. Good parts make a fantastic whole.

Place in pan in this order
Besciamella
*Pasta
Broth (wet well )
Besciamella
One veg
Parmesan
Repeat from the *.

I like to do the veg layers as follows:
Eggplant
Tomato w/ basil salt and olive oil
Zucchini
Other
The pan will probably only hold four layers broom and seal with besciamella.
Bake at 350 for 45 min or till golden. Allow to set for 20 min and dig in!


Thursday, March 21, 2013

Almond torte

I have a little bit of a food obsession. But I'm not alone. Most of you do too.

As a side job I teach Italian language class. It's a small class and we usually use 30 minutes of the class to chat and to eat something wonderful.

A couple of classes ago my student Katherine brought us this beautiful Almond Torte. She made it from scratch, just a simple yellow cake recipe with the addition of marzipan into the batter. It had homemade whipped cream with almond extract and chocolate shavings. So so good.

Take the bit of time to do a scratch cake for a sweet afternoon tea time. It makes the memory.


Sunday, March 17, 2013

Orange Salad-Insalata d'Arancia

Sicily is the home of citrus in Europe. Look in the side door of restaurants around the continent and you'll see Sicilian names on the fruit cartons like Paternò (CT), our Sicilian family's home town.

Flying into the Catania airport you see the presently very active volcano Etna, and miles of orange and lemon trees. The volcano erupted a few centuries back covering most of the southeastern side of Sicily, leaving 10 feet or more of lava and ash to enrich the soil of the future, the result being more oranges than you've ever seen in all of Florida.

In winter and early spring the oranges are in full swing, and so economical it is a shame not find some wonderful use to consume large quantities of them. Orange salad is one way.

We eat orange salad either plain with onion, or combined with sliced fresh fennel, or in this case with fennel and avocado (only in America though!). There are 'food rules' you must abide by. Orange salad is always dressed with olive oil and salt, but the acid changes depending on what else you're putting in. The main rule is, if you add fennel it must be lemon juice. Period.

Original orange salad:

10 naval oranges
1/2 bunch green onion, chopped
Or 1/4 cup thinly sliced red or white onion
Salt
Olive oil
Apple cider vinegar.

Cut the ends off the oranges and then slice the skin off in strips, removing the white parts. Cut peeled orange in half, then each half in thirds and thirds again, making 9 bite sized pieces of each half. If you get the hang of this method you'll come to love it for cutting all kinds of fruit, like cantaloupe and watermelon.

Place oranges in glass bowl. Add chopped onion, mix, and dress with oil and vinegar and salt. Mix well and taste. It should be sweet and tangy with a taste of salt. Serve immediately or set aside for 30 min to blend flavors. Enough for 4-5.

Orange Fennel Avocado Salad

1/2 of a large fennel bulb
3 oranges, peeled and chopped as above
1 large avocado, seeded and cut in cubes.

Cut the fennel in half again, and slice thinly. Place in bowl with the orange bites, and dress with olive oil, lemon juice and salt. Add the avocado at the end and toss immediately to coat with lemon. Taste and adjust dressing. A little extra salt is in order because of the avocado. Yum. Serves 4.

Don't skimp on the olive oil just because it seems odd to put it on fruit. You should see a little shine on the fruit from it after its mixed. Use good oil too. Nice and green. Lastly don't skimp on the salt, and use good salt. I like Real Salt, a little lighter flavor and full of minerals.

Enjoy!

Real Italian Crusty Bread


Many food lovers have been on the bread journey. Tried this recipe and that, tried different yeasts, sourdough starters, making their own 'mother'. How to get the perfect crumb, perfect elasticity, perfect crust. Organic flour, bread flour, fresh ground wheat or soaked and sprouted wheat. So many variables.


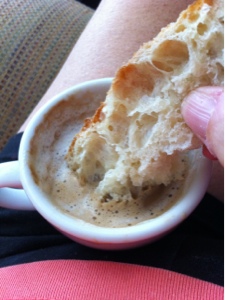
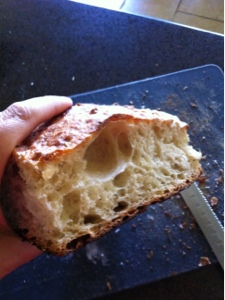
This is a great place to stop and breathe and enjoy yourself. Can't mess this up. At all. It's impossible. And you end up with the most beautiful, crackled crusted, elastic Italian bread with gaping holes in the crumb...just pure bread joy. You've gotta try this bread. It isn't the easiest bread but for sure it's the best I've had. Lets do it.

At about 8pm, In a mixing bowl put 3 cups bread flour, 1/4 teaspoon dry yeast, and 2 teaspoons salt. Mix that up. And yes, 1/4 teaspoon is all. In fact you could make 10 loaves from the yeast in one packet.
Add 1 5/8 cups warmish water. Actually doesn't have to be warm, but since its cold here I use warm to get it started using your fingers kind of toss the flour to wet it, and after turning the bowl around a couple of times it should be a kind of wet goop. If there are dry spots just sprinkle a tad more water. Now cover with plastic wrap and put in a cold oven and leave it for 12-14 hours.
After first rising - 14 hours
Next day, between 8 and noon, check the dough. It should have tiny bubbles all over the top. Heavily flour a countertop and scrape out the dough.

Sprinkle with flour so it doesn't stick to the world.  Then with a scraper fold the dough in thirds like a piece of paper, cover with that piece of plastic and let rest 15 min. 
Rest covered 15 min.


Heavily flour a cotton towel
Meanwhile take a tea towel, or a cotton napkin, and the tighter the weave the better (never terry cloth), and rub flour into it. Lots of flour. Cover at least the area the bread will sit on when you move it onto this towel in the  next step.
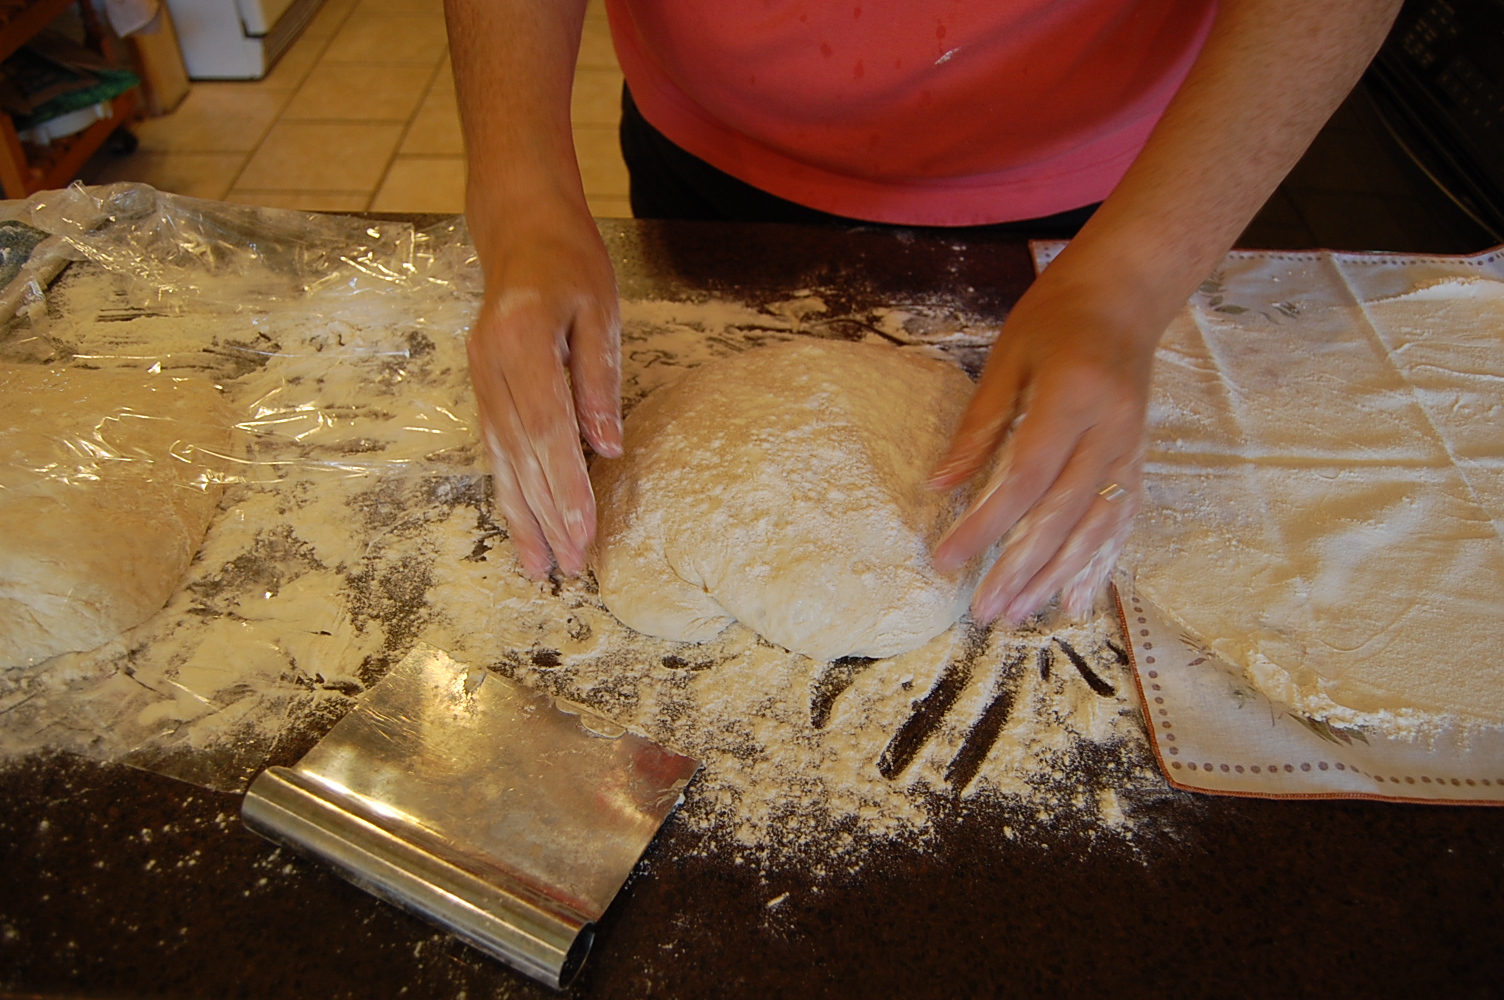
After the 15 minutes, remove plastic wrap, flour it so you can handle it, and fairly quickly pick it up, and tuck the edges under all around kind of making a ball of socks. Set it on the cloth, cover with plastic again and another towel as well, and let rise 2 hours.

Form a boule (turn inside out)


90 minutes into rising though, put the oven rack on the very bottom level, turn on to 450, and put your oven-safe pot and lid inside. Make sure the lid is oven safe too. It'll get to heat for those last 30 minutes and be ready to make that wonderful crust.

Now it's been two hours of rising. Using two oven mitts, remove the pot to a hot pad on the counter, and with a mitt remove the lid (I always forget that the lid is scorching too).

With a scraper, kind of scrape the dough gently up from the towel, because its attached itself notwithstanding the cup and a half of flour you rubbed in, but just around the sides. Then put your hand under the towel, pick up the dough and flop it over into the pot. Try to aim well. If it sticks to the sides just don't worry about it. With the mitts, put the lid back on and all in the oven.


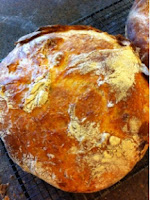
Bake 30 minutes. Then remove the Lid and bake another 20-30 minutes or until nice and brown. When done, with the mitts on, remove lid and dump the bread out on a cooking rack. Rap on the bottom. it sounds hollow when done. It'll pop and crackle and just sing wonderful serenades of bread love to you. Resist the temptation to cut into it right away. It needs to sit for 15 min or so and then it's fair game.


Hope you try this. It's so empowering to be able to make something this wonderful. Enjoy!

_____________________
Here's a quick time line for your bread:
-8pm Day 1  Mix dough, cover w/plastic, place in cold oven
-8-10am Day 2 Dump dough on floured surface, rest 5 min, fold and make a ball, cover with plastic and let rest 15 min.
-Flour a smooth cotton towel heavily
-After the short rest, remove plastic, form a boule, place on towel, cover with plastic and another towel, rise 2 hours.
-After 1 1/2 hours, place oven rack on lowest rung, heat oven to 450 with pot and lid inside.
-After 30 more minutes, dump bread upside down into pot, cover, bake 30 min.
-Remove lid and bake 20-30 min more or until browned.
-Flip out on a cooling rack to cool.


Italian Marinated Grill

Spring and summer in Italy means cooking out. Everyone has a grill even if they don't have a back yard. Hibachi grills on balconies, or cinderblocks set up on the roof or terrazza, there's a grill somewhere.

Grilled thinly sliced meats, veal, chicken breast, tiny whole roosters (gallito), quail and sausages of every possible mix of meats and condiments. This is the core of warm weather Italian cooking. It all begins in March/April with the 'scampagnata' or 'Pasquetta' (the Monday after Easter) or escape to the country.

Many Italians take this national holiday to have a picnic in the woods or countryside complete with all sorts of grilled meats, grilled stuffed artichokes, salads, great bread, cold cooked vegetables, wine and desserts. It's a feast day and a great day full of food, family and friends. If no grill, no problem. Build a campfire and top it with a large ceramic roof tile, let it get hot and cook on that.

Grilled meat in Italy is almost always marinated with a form of salmariglio. It has a base of olive oil, an acid of either lemon juice or vinegar, salt, pepper and herbs. If the meat isn't marinated in it, it's at least basted on the grill with it. Salmariglio serves to moisten and flavor, and to bring the meat to produce a fantastic sughetto, or sauce. After grilling the meat it's placed in a deep plate to collect all that yummy flavor, then spooned over the meat when served.
Salmariglio

Today the Sicilian brought home a case of mangoes. That means grilled chicken with mango salsa. Today anyway. I won't ferment the salsa this time. Check out the fermented posting for some salsa to save for another day. This one will be fresh.

Meat in Italy, as in most of Europe, is very expensive, so they use it sparingly. Steak is cut into thin slices and grilled quickly, and the same for chicken breast. I love how they slice it in Italy, as it is never tough, the flavor gets all the way through,, it's great. Here's how.


To cut the breast thin just lay it on a cutting board, press your hand flat on top, and with a large sharp knife cut horizontally about 1/4" down. You'll feel the presence of the knife and be able to adjust so as not to cut yourself. Each breast can make 3-4 servings of chicken.

In a non-metal bowl put about 1/2 cup olive oil, juice of a lemon, a tablespoon rosemary, a teaspoon salt, and a pinch of red pepper flakes. Mix that and add the chicken, tossing to coat. Let sit 30 min or more.

Heat a stovetop grill pan on medium high. When hot put the chicken on one price at a time and rub back and forth so it doesn't stick, and cook each side for a out a minute or until texture is firm. Baste with the marinade once or twice. Done! If you want grill marks just press down a little on each side.
Place in a plate and pour the grill juice over. I served it on a bed of baby spinach, which the meat wilted nicely, and a fresh mango salsa.

Mango salsa included mango, a bit each of minced onion red pepper and jalapeño, salt and pepper, olive oil and lime juice. Let it sit while the chicken marinates and cooks. So so good. Enjoy!


Homemade Chicken Stock: aka Liquid Gold

Asked the Sicilian to get me some pastured chicken breasts for a quick lunch today. He brought back two whole chickens. They were only $2 more, so why not? What a deal!

Cleaning those chickens took all of 3 minutes at the most, and they produced four plump breasts, four chicken leg quarters, four wings, necks, hearts, gizzards and a carcass with some gorgeous broth inside there I just had to get out.

First I tossed the organ meats in some almond flour with salt and pepper and quick sautéed them in butter and olive oil for a treat (and a vitamin boost). Then made some homemade barbecue sauce and threw the legs and wings in there for tomorrow. The breasts were marinated and grilled for lunch with mango salsa while I used the 'trash bits' to make liquid gold.

Homemade chicken broth from pastured chickens is nothing like purchased broth or even homemade broth from standard chickens. Standard store chickens produce enough foam when simmered to make the steeliest of stomachs queasy to look at it, and purchased broth is, well, blah. Broth is just too easy to make not to do homemade.

As I cut up the chickens I have my largest thickest bottom pot ready and toss in those carcasses, the wing tips, and necks. Add an onion cut in half (washing and leaving the skin will produce that beautiful golden color btw), a couple of carrots washed and broken in half, a tsp of peppercorns and a bay leaf or two. Bring to a boil on medium, skim off any tiny bit of foam, cover, and put on low. If steam is escaping them you need lower heat. If you're already on low, just move the pot over so part isn't on the heat. Adjust as needed so that when you check it, you just see a few bubbles. Not boiling. Leave it for 24 hours. Yep. 24. Your kids will be asking for homemade soups, dumplings, and more. Smells great.

When done, allow it all to cool. Then remove the carcasses into a dish, pour into a bowl through a sieve , and discard whatever's not meat.

Put the broth in some 1 or 2-qt plastic containers and freeze. Remove the meat from the carcasses and make salad, chicken soup, tacos, whatever. Use or freeze.

It's free, it's good for you (all that great natural collagen for your bones), and it's zero work. Can't beat that! Buy a whole chicken next time. And feast! Enjoy!

Saturday, March 16, 2013

Pastry Cream...the Good Stuff

Pastry cream isn't a new thing.  Truly, a couple eggs, some milk and a little flour, and you have it.  I like simplicity.  Occasionally I find a recipe that is a little labor intensive (more than dump and mix) and the return on investment (the time and effort) is so well worth it that I don't go back to the easy way.  This is one of those.  Have you ever had a pastry from a store and thought, 'That is just too perfect. No one could create this texture at home with real ingredients.'  Yes, you can...

FANCY PASTRY CREAM:
Ingred:
2 cups half-and-half (or 1 c whole milk + 1 c cream)
1/2 c sugar
pinch salt
5 egg yolks
3 tbsp cornstarch
4 tbsp cold butter cut in 4 pieces
1 1/2 tsp vanilla

Heat the half-and-half, 6 tbsp of sugar, and salt in a heavy round bottom sauce pan (a saucier) over medium, stirring.

All Clad Stainless Steel 1 Qt Saucier Pan - 8701004436 (Google Affiliate Ad)
In a separate bowl, whisk the egg yolks until combined.  Add the 2 tbsp sugar thats left and whisk to dissolve and is creamy, about 15 seconds.  Add the cornstarch and whisk until pale yellow and thick, 20 seconds.

Now to temper the eggs.  The important part about this is to WHISK a lot while you add the hot liquid to the eggs.  Otherwise, you'll end up with pieces of cooked yolk in the cream, and no one wants that.  Just stream small amounts of milk into the eggs, running the whisk back and forth briskly to quickly dissapate that heat in the eggs... Here goes....
Professional Wood-Handled Whisk, 8" Balloon (Google Affiliate Ad)

When the milk is up to simmering (steaming and maybe a few bubbles around the edge but NOT boiling), add a little of the hot milk to the egg and whisk, adding a little more and more, whisking, to raise the temperature of the egg without cooking it.  When the egg liquid is warm, do the same thing the other way: drizzle the egg into the hot milk, whisking constantly, until all incorporated.  Keep on medium heat, and keep whisking until large bubbles burst on the surface.  Don't go anywhere,  it should be nice and thick in about 30 seconds.

Take off heat and add vanilla and butter, and whisk in.

Camford Stainless Steel Mesh Sieve, 4" (Google Affiliate Ad)
This step is another important one, giving your cream the absolute perfection you only dream of.  At least I do.  Using a nylon or metal sieve (like you'd use to sift powdered sugar on top of something), pour in the hot cream set over a glass bowl.  Stir it around, mashing it through with a rubber spatula or spoon until it's all in the bowl.  Now lay a sheet of plastic wrap or buttered waxed paper on the cream surface to keep all air from touching the cream (it will prevent a nasty skin forming) and put in fridge 3 hours to overnight.

After chilling it's ready to go.  Whisk it up again, put in a pastry bag or a ziploc with the corner cut off and pipe into your cream puffs or eclairs!  Even spoon into dessert cups and serve with pirouline cookies or dust with cocoa and give em a spoon.  

***Coffee Pastry Cream: Use 1 Cup sweetened espresso coffee and 1 cup half-and-half instead of 2 cups halfandhalf for AMAZING coffee pastry cream.
***Chocolate Pastry Cream: Add 3 tbsp unsweetened cocoa to the yolks, and 3 oz bittersweet chocolate, chopped, when you add the butter at the end for wonderful chocolate pastry cream.

Friday, March 15, 2013

Chicken Enchilada Chili

Crock pots are useful friends of busy cooks. My problem is that whatever cooks in a crockpot seems to lose its identity. All the flavors kind of dissipate and blend together, and for some reason they diminish. This recipe is one exception.

Cuisinart Round Slow Cooker - 4-Quart (Google Affiliate Ad)

In the morning, grab some cans, a couple of produce items, chop, dump, and leave. So easy and so good. Make some Quick Beer Bread when almost dinner time to serve alongside and dinner will be a hit.


White Porcelain Cream Soup Bowls - set of 4 (Google Affiliate Ad)

Dump in a crock pot:

2 cans original Ranch brand beans
1 can enchilada sauce (I use mild red)
2 cans stewed tomatoes w/ garlic (or plain, and add 2 tsp garlic powder)
1-1.5 pound chicken thighs, rinsed
1 large onion, chopped
1 bell pepper, seeded and chopped
1 tsp paprika
1 tsp cumin
Toppings: chopped onion, chunked avocado, cheese, chopped cilantro (opt)

Cook on low for 8 or hi for 4 hours. Top when serving with your choice of add-ons like chunked avocado, grated cheese, more chopped onion, tortilla chips, chopped cilantro.

So much flavor in this dish.  Even great as leftovers on a bun for a Chicken Sloppy Jose! Enjoy!


Thursday, March 14, 2013

Asian Greens Salad

It's recommended by oodles of nutritional therapists, dietitians, and special diets to increase the quantity of raw vegetables in our diet. Some say as much as 80% of what we eat should be in raw form.

Seems like a lot and, wow, how in the world is that even possible unless we turn into rabbits? It is possible. But you have to be creative. Those plain old spinach or iceberg salads with a chopped tomato and maybe a little onion get really old unless slathered with fat laden processed dressings. And nobody wants that.

A Mother and Daughter Diary of Raw Food Recipes for Beginners by Carte (Google Affiliate Ad)

This salad was shared with me by a vegetable co-op member and has morphed into something that we make just to keep in the fridge for snacks and lunches.

You can make it with bokchoy, green cabbage, even rainbow chard. I've done them all and they're all great. It holds up well for a few days even dressed, staying crisp and getting even more flavorful.

Collapsible Salad Spinner, 5 qt. (Google Affiliate Ad)

Asian Greens Salad

In a bowl put:
1 whole green cabbage (chopped fine-I use the grated blade on the food processor), or 2 bunches chard or a large bokchoy(chopped)
1-2 carrots, peeled and grated
1 bunch green onion, sliced (can sub some thin sliced red or white onion)
1/2 c chopped, sliced or slivered raw organic almonds (or walnuts or cashews)
1/2 c raisins or dried cranberries

In a separate bowl, whisk together:
2 tbsp soy sauce
2 tbsp sesame oil
1/2 c olive oil
1/3 c rice wine vinegar (or apple cider vin)
1-2 tsp salt (to taste)
1/4 c sugar

Dress salad and toss. Store covered in fridge. It's great if you can leave it 30 min or more to macerate. Better still the next day. Did I mention that a whole cabbage lasts our family of 5 no more than a day and a half? Just sayin'. Yum. Enjoy!


Wednesday, March 13, 2013

Quick Beer Bread

I don't like beer under normal conditions. I've tried. The Sicilian likes beer. Maybe that comes from the old European problem of no clean water, so they drank beer...maybe not.

Beer though, when added to the ingredients listed below and slathered in fresh butter, is transformed into a beautiful fermented, yeasty, satisfying something wonderful. This is worth going and buying a six pack of some funny named lager. Bicycle. Fat Tire. Red Shoe. Ok the last one isn't a real beer, I don't think. Sounds good though.

Do this though, and today. You'll thank me.

Quick Beer Bread

3 cups flour
3 tbsp packed brown sugar
1 tbsp baking Powder
1 tsp salt
1 12 oz room temp beer
4 tbsp melted butter

Mix the dry ingredients. (Remember my grandma? Cooking isn't hard. Just follow the general rules. Mix the dry stuff first.)

Add beer and stir 20 times to combine. Not a lot. Just enough to moisten.

Rachael Ray Oven Lovin 9 X 5 Nonstick Loaf Pan (Google Affiliate Ad)

Put in a 9" buttered loaf pan.

Pour melted butter over the top.

Bake at 375 35-40 min.

Try not to burn yourself after it comes out. It really will still be good if you let it cool a bit.

If you can wait, and you can plan ahead, serve it with chili or stew. Or butter.
Enjoy!

Tuesday, March 12, 2013

The Old World Twinkie

The what?

What did we do before the poptart or Twinkie? In the old days, before packages cookies and snack cakes they used what they had on hand. Bread. Having some wonderful Italian bread on hand from yesterday reminded me...

American mornings: a hunk of yesterday's cornbread with some of this mornings warm raw milk (yum)

Italian Mornings: cappuccino or caffelatte with yesterday's wonderful crusty holey bread dunked in it, instantly taking in the flavors of good coffee, milk and sugar (having this as I write)

Giordano Coffees and Espresso Machines

American afternoons: a hunk of bread with a slather of homemade butter and a tiny sprinkle of sugar (such a treat)

Italian Afternoons: that day's bread with a drizzle of olive oil and a sprinkle of salt, or with a very small piece of cheese or salame to nibble between bites of bread (found in the grubby fists of little Italians playing outside even today)

Giordano Cappuccino Collectible Cups

Have our taste buds become so sophisticated that we are too good to eat plain, simple, real food anymore?
Back to real food! It's worth the trip back.


Monday, March 11, 2013

Cranberry Almond Caramel Pancakes

Definitely a must-try! At our house we do birthday breakfast. Mainly it's because mom just can't wait to start celebrating. I'm terrible at holding off, so I start at about 6:30-7:00 making something wonderful for the birthday king or queen of the day.

This year my daughter turns 17 and I wanted to do something new. Often times we do crepes, or a breakfast casserole, omelettes, etc. Always with flowers and some fruit and a pretty cup of something.

I found this recipe and just had to try it. Of course I had to change it too.

Here goes.

Cranberry Almond Caramel Pancakes
(5 servings)

For The Pancakes:
2.5 cups all-purpose flour
1/4 cup sugar
2 tbsp baking powder
1/2 teaspoon salt
1/4 cup melted butter
2 large eggs
1/2tablespoon vanilla
1.5-2 cups milk
1cups dried cranberries (soaked in 1/4 cup orange juice or a little hot water to reconstitute)
1/4 cup slivered almonds
Optional : zest of an orange

For The Caramel Sauce:
3/4 sticks butter
3/4 cups brown sugar
3/4 cups heavy cream

1 c Whipping cream and 2 tbsp sugar for whipped cream

Stick a metal bowl and your electric beaters in the freezer to prep for whipping the cream.

Mix all dry pancake ingredients together in a bowl. Put eggs, melted butter, vanilla and milk in another bowl, beat a little and add to dry ingredients. Stir to combine. Add enough liquid to make it thick but not tough. It'll start bubbling up from the baking powder and you'll see if you need a little more milk to make workable. Fold in drained cranberries and slivered almonds and zest if using it.

Butter a griddle heated on medium hi and place 1/4 cup of of batter on griddle. It'll be thick so just poke it to make something like a circle. It'll really puff up so don't worry if it seems small. Should be around 4" diameter. Flip when bubbles appear on surface and edges are dry, and cook the other side to a golden brown.

For the Caramel Drizzle. You can make this while the pancakes cook... Melt butter in a skillet on medium and then add brown sugar. Whisk and continue to cook until mixture comes to a boil. Add add heavy cream while whisking. Reduce heat to a low simmer. Stir and cook until mixture comes together and thickens slightly. As mixture cools down it will thicken. Pour in a gravy boat or bowl to put on the table.

Plate pancakes, top with whipped cream, drizzle caramel sauce, garnish with dried cranberries and almonds.

Makes 5 servings of 3 pancakes each.

Enjoy!

Saturday, March 9, 2013

Spaghetti n Meatballs

What most Americans think all Italians eat on a regular basis. Spaghetti and meatballs. Truth be told, it just ain't true.

The Italian style of eating involves a course system, eating a pasta or starch dish with a sauce first, followed by a meat dish with a side of vegetables. Salad comes after all that, or sometimes as a side. My mother-in-law cringed when I told her we serve meatballs on top of our spaghetti. It actually made me laugh.

They DO make sauce with meatballs though, and it's wonderful. They just go about it a little differently. Here's her recipe with a few tweaks.

Needed:
A pound spaghetti (btw if you use thin spaghetti then only use 2/3 lb)

For Meatballs:
A pound ground beef
1/3 c Parmesan
1/3 c Italian seasoned breadcrumbs
An egg
2 tbsp milk
1 tsp salt
1 tsp garlic powder
Dash cayenne

For sauce:
24 oz tomato passato /purée
1 tsp garlic powder
1/2 onion chopped
1 tsp sugar
1 tsp salt
1 tbsp basil
1 tbsp oregano
Dash cayenne or red pepper flakes
Olive oil

Start with the sauce. In a saucepan heat 1 tbsp olive oil on medium hi heat. Add chopped onion and sauté until golden and soft. Add everything else except the red pepper/cayenne and simmer on med lo.
Brylanehome Stainless Steel Pasta Pot And Steam Insert (Google Affiliate Ad)
While it simmers, go ahead and put a pot of water on to boil, and you can make up those meatballs. Combine all the ingredients, not working it too much. Btw, guesstimating is perfectly ok. I don't measure. I use a handful of Parmesan and a handful of breadcrumbs per pound of meat. Now splash a little milk on the meat. Makes it so so creamy good. Shape into balls (a little bigger than a golfball) and FLATTEN gently. Yes you heard it. Flatten. They're not round. Flatten to about 1/2" thick. In a skillet on medium hi, heat a tablespoon of olive oil and brown the meatballs. They don't need to cook through.

As they are done, just toss into the sauce and move to cover them up with that yummy tomato goodness. Taste the sauce btw for salt and acidity. Too acid, add sugar. Have some bread to warm? In the oven it should go now, at 275.

Cook the meatballs 10 minutes and at that point salt your pasta water (PLEASE salt the water and with about 1 tbsp per 2 quarts) and toss in the pasta. It'll cook 9 minutes for spaghetti an by then your meatballs will be done. At the same time add the cayenne to your sauce and stir in.

Timing here is perfect. When you bite that pasta (and yes, bite the pasta) it should be al dente -holding up to the tooth. Then turn off the sauce, dip a mug in the pasta to save some water, and dump the pasta in the colander then back in the pot. Don't forget to get the bread from the oven!

In Italy we would pull those meatballs out of the sauce and save for the 'secondo', or second course, but we are here and not there. Dump it all, sauce and meatballs, into the pasta pot and gently toss. Sprinkle with Parmesan and you're ready. It's a great thing.

The meatballs, by the way, are a great dish to serve even without sauce. Lower your skillet temp, add a cover and cook through. When done top with a little cheese and let melt in (I add the cheese while in the skillet and cover the skillet...it gets all melty and bubbly and just yummy). Serve them with something moist, like a creamed spinach ...see a future blog for that one. Even save for lunch boxes! So good. Enjoy!